Install the Garage Shield in 60 Seconds
Install the Garage Shield in sixty seconds with no tools. This complete garage shield installation guide walks you through every step, from unboxing to securing your door against the 6-second break-in. No drilling. No wiring. No batteries. Installing the Garage Shield is the fastest defense in residential security.
Basic in Appearance. Custom-Engineered in Performance.
Don’t let the simplicity fool you. The Garage Shield is a patented, custom-designed part that exists for one purpose: to defeat the 6-second break-in while staying fully compliant with federal UL Code 325. Every dimension, every angle, every fastener was engineered for that single job.
It looks like a piece of plastic because it is a piece of plastic. ABS. Lightweight. Rust-proof. Rattle-proof. Quiet. Invisible from inside. And the only thing on the market that does what it does.
What’s in Your Garage Shield Installation Kit
Six custom-fabricated parts. Every dimension chosen for one job. No tools required to install the Garage Shield.

Before You Begin
Do NOT over-tighten the thumb screw. Do NOT push in the fasteners until you’re ready to install. Once they’re seated, they’re difficult to remove.
Garage Shield Installation: Visual Guide and Video
The visual on the left shows what the finished install looks like on your J-arm. The video on the right walks you through the exact snap-together sequence in real time.
Visual Snap-On

Garage Shield Installation Video
60 Seconds. Four Steps. Zero Tools.
That’s the math. A one-minute install protects you against the six-second attack. The fastest defense in residential security relative to the threat it stops. Here is exactly how to install the Garage Shield in four steps.
- Hold the Shield in position against the J-Arm and align the Brace assembly for best fit.
- Position high as possible (see video). Snap together.
- Tighten the Thumb Screw to secure in place, without over-tightening.
- Optional: Loop emergency rope behind the Thumb Screw to further secure it from outside reach.
Looping the Rope is Optional
This is not required, because a criminal is attempting to catch the metal latch, not the rope. The rope is too difficult to reach from outside. UL Code 325 requires the emergency rope handle to be no further than 6 feet from the floor, so don’t loop it so high it goes out of reach. Read the regulation →
Garage Windows Warning
If you have garage windows, black them out. Garage windows act like X-ray vision for a criminal lock picker. They see your stuff, your schedule, and your vulnerabilities. Frosted film is $15 and ten minutes.

Garage Shield Installation FAQ: Six Things People Ask Most
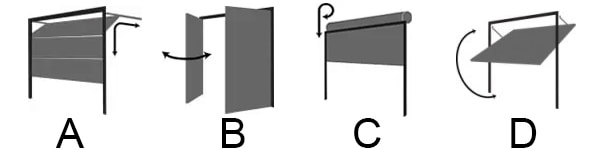 Type A: Sectional: Yes. This is what the Garage Shield is engineered for.
Type B: Side-Hinged: No. No automatic opener, no 6-second vulnerability.
Type C: Roller: No. Different mechanism, not vulnerable to the coat-hanger attack.
Type D: Tilt-Up / Canopy: No. Single-panel pivot, different release type.
If you’re not sure which type you have, email us a photo and we’ll confirm before you install the Garage Shield.
 You can also contact us or buy replacement parts from our shop.
Help Another Homeowner Sleep Tonight
Your review on Amazon takes 30 seconds and decides whether the next family on this page protects their garage or doesn’t. We read every one. Join 500+ verified buyers who already shared their experience.
 Leave a 5-Star Review
Three Things Every Garage Owner Should Know
The threat your shield just neutralized is worth understanding. Here’s the deeper reading on each angle.
The 6-Second Break-In
How thieves use a coat hanger and a few seconds to bypass your garage door opener. Your shield stops it. Here’s exactly what they were doing before.
Read More →UL 325 and Your Rope
Why the emergency rope must hang within 6 feet of the floor, why you should never zip-tie or remove it, and how the shield works with federal code instead of against it.
Read More →Black Out Your Windows
Garage windows are X-ray vision for a lock picker. They see your stuff, your schedule, and your vulnerabilities. Frosted film is $15 and ten minutes.
More Tips →Most Homes Have More Than One Garage Door
Most homes have one garage entry. Many have two or three, plus extended family who probably should have one too.
Got a Second Door?
Two-car or three-car garage? Each opener is its own vulnerability. Add another shield. Our 2-pack and 3-pack save you money on the per-unit cost.
Send as a Gift
Parents, the kid in the first house, the friend who just got broken into. Sixty seconds to install, peace of mind for years. Amazon ships direct.
Bulk and Reseller Pricing
Property manager, HOA, locksmith, installer, builder? We offer wholesale pricing on 10, 50, and 200+ unit orders. Email us with your quantity and we’ll send pricing direct.
Still Stuck?
The FAQ above handles most situations. If yours is unusual, send us a photo and we’ll walk you through it personally. Email Support →
Add Another Shield
Two-car garages need two. Three-car garages need three. Multi-pack pricing on Amazon makes it easy.
Order Another on Amazon